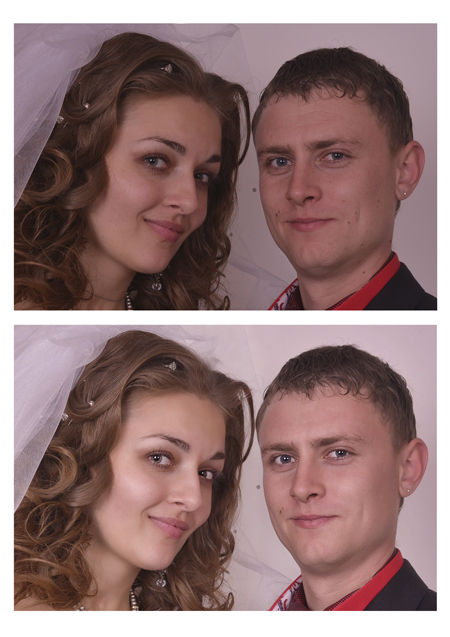
The tool is really easy. In the process of editing use Surface Blur filter
1. First you need to remove it all the defective parts.
After that press Ctrl + J to copy the background layer image.
2. Select a Surface Blur filter from menu Filter> Blur.
This filter keeps the sharp edges of objects. In the dialog box, set the Radius slider at approximately 39 pixels. Slider Threshold defines which tones of the image will be blurred. The main thing in this case is not to select a value higher than the Radius slider (in this case the value is 31.) At this stage the skin of the model looks quite unattractive. Click OK to apply your settings.
3. Decrease the value of Opacity to 50%.
As a result of Surface Blur filter the entire image got blurred, and we need to blur only a face of model. Therefore, all of the pieces that need to remain sharp should be hidden with a black mask.
4. Click the Add Layer Mask icon on the Layers panel, holding down the
As a result, the black mask will be created on a new layer. Since the mask is filled with black, the blurred layer will be hidden, and an original image of the background layer will open. The point is to blur the skin only, leaving all the other parts (eyes, hair, clothing, jewelry, etc.) clear. Set the white color as the main one and activate a Brush tool. Now paint all the fragments of skin, you want to smooth out.
5. Make sure you did not miss a single fragment on the face, needed to be blurred.
To do this, hold down the 
6. Now you need to load the mask of selected area on the opened color image.
Holding down the
Use the short cut
8. Make the created layer with copied fragments of retouched skin in the upper Layers panel, drag its thumbnail above all other layers.
In order to get back the texture on the skin, select a High Pass filter from menu Filter> Other. The filter dialog box will appear. Drag Radius slider to the far left position. The picture will become very flat, but do not rush to click the OK button. Slowly drag the Radius slider to the right until the dark and light fragments on the image and the texture of the skin appear. Drag the slider to the right until the glow starts appearing on the edges. I stopped at the position of 6.3 (to the right after this value the edges of objects began to glow). Click the OK button.
9. To superimpose the texture layer on the image perfectly, pick a Soft Light or Overlay blending mode on the Layers panel for the top layer with a gray texture.
In this case, almost all the texture that was almost completely removed from the image by applying a Surface Blur filter, will recover on the skin.

